3 Ocak 2013 Perşembe

Sew Darn Crafty Linking Party...Week 94

To contact us Click HERE
Hi everyone!! Here's to another wonderful linky party. I hope you can share some of your wonderful projects this week and I also hope you enjoy all the links everyone share!!


WHAT IS A LINKING PARTY...
I subscribe to a linking service, which provides the ability to link thumbnail pictures on my blog. The picture is a link that other bloggers provide to share their projects.
Two things can happen at a linking party...looking and/or linking
  • you can be greatly inspired by wonderful projects, ideas or vacation pictures (looking) and/or
  • you can share what you've been up to (linking)
If you want to be inspired by all the great ideas...just click on a picture and it will take you to that post from a wonderful blogger who was willing to share her thoughts and ideas.

HOW AND WHAT TO LINK TO THE PARTY...
Sew Darn Crafty is all about YOU!! Show off your projects, share a tutorial, show us your vacation pictures, share a family favorite recipe...share anything. Not only does linking inspire us all, it also brings lots of new people to your blog for a visit. Click here for past parties and lots of inspiration
Easy steps to join in on the fun...
  • link up to the specific project post, not your whole blog. Makes it easier to link right to that post and not  search through all your entire blog. To find the http address to a specific post, just click on the Title of your post. Copy and paste the address that's at the top of your computer into the linky steps.
  • link as many projects as you'd like...old or new
  • anything goes...cooking, sewing, knitting, crafts, organizing, remodeling projects, vacations, parties etc...
  • visit other links to share some blogging love! You know we all love comments!
  • linking is open til Saturday night, so plenty of time to join in
  • just click the blue "click here to enter" button which is at the very END...below all the other picture links that everyone has shared. Click and follow the easy steps

If you want to add the button to your blog's side bar or add it to your list of parties that you're in each week...Click HERE for a tutorial for adding a button


Have fun linking up! Don't forget to come back and take a look at all the great projects during the week~Karen~

Pin It

Christmas Village Idea...

To contact us Click HERE
I started the Department 56 Dickens Village over 26 years ago. I just love the look of the village at Christmas time. I have displayed the pieces in so many places around our home...bookshelves, china cabinets, tables and little nooks here and there.

This year I displayed the villages in my master bedroom...first time in this room!!

I split the village up in 2 spots. I placed some under the tree and the others on top of an armoire.


This tree was in our family room in past years. It was a 12 foot tree. We bought another 12 foot tree that was wider and fit better in the family room.
Never wanting to give anything up, I didn't use the bottom section of the tree turning it from a 12 foot tree to a nine foot tree. It fits in one spot in our bedroom...just as you walk in the door. Perfect!!
This tree is in memory of my mom. It's filled with her favorite ornament collection of little wooden Steinbach people.


Here is the rest of the Dickens Village on the armoire.


I used the empty boxes the houses come in to lift up them up in the back. I just covered it with a little thin batting.


This year's display was a little easier for me. I didn't use any of the people, accessories and I didn't put the lights in each house. I did put 2 small window candles on top of the armoire to give it a little glow. Works great!!

Have a great day,
~Karen~

Pin It

Delicious Cookie Recipe..."Nana's Good Cookie"

To contact us Click HERE
Hi everyone!! If you're looking for a last minute cookie recipe to bake for the holidays (or any time of year, actually), this is our family favorite.

This is my mom's recipe and her recipe card was titled "Good Cookie", so that's what we call them...Good Cookies.

In honor of my mom, I want to share her recipe for Good Cookies. We miss her every day, but especially during the holidays.


This cookie is sugary, crispy and tender at the same time. The recipe makes a lot too...80+ cookies, depending on the size you make them.


Good Cookie

1 cup oil1 cup butter, softened1 cup packed brown sugar1 cup sugar1 cup plain corn flakes1 cup quick cook oatmeal3 1/2 cups flour1 teaspoon baking soda1/2 teaspoon salt1 egg, beaten1 teaspoon vanilla extract1/2 cup chopped nuts...I use walnutsextra white sugar for topping
Mix all ingredients together in large bowl with a mixer. Hand roll a spoonful of dough into a ball and place on ungreased cookie sheet 2 inches apart. I roll my balls about 1 inch to 1 1/2 inches wide.
Take a drinking glass and moisten the flat bottom of the glass on a wet or dampened paper towel.  Then dip the wet glass in a bowl of white sugar. Flatten each ball with the sugared glass. Flatten to about a 1/4 inch. 
You can also use colored sugar for the holidays too!!
Bake at 375* 8-10 minutes or until golden on the edges. Cool on cookie sheet for a few minutes then transfer to cooling rack.
Dough may be refrigerated for several days before baking.


Enjoy,
~Karen~

Pin It

mini s'mores cupcakes

To contact us Click HERE

This is last dessert in my series of posts on the goodies that I made for Cherish's wedding dessert table.  (In case you missed them, I also made Hello Kitty macarons, football and tooth cookies, and potted plant chocolate puddings).  Cherish had wanted some kind of cupcake on the dessert table, and since s'mores were one of the things in her "list of likes", we decided on mini s'mores cupcakes.


I ended up using an adaptation of a recipe that I had previously used from 6bittersweets, except I used my favorite Ina Garten chocolate cake recipe.  And since I was making mini cupcakes, I didn't think the graham cracker crust on the bottom would fit, so I just sprinkled crushed graham crackers on top of the batter before baking.

Once the mini cupcakes were baked and cooled, I made the marshmallow frosting (which is basically a Swiss meringue frosting), for which I followed the recipe exactly.  I used a large open star tip to pipe the frosting onto the cupcakes, and then used a creme brulee torch to lightly brown the frosting.

While I thought the cupcakes were was delicious and marshmallowy the night they made, by the next day (the day of the wedding) I bit into one and felt as if the frosting had become light as air.  That wasn't necessarily a bad thing, but I had wanted the frosting to retrain it's gooey marshmallow texture.  So next time I think I'll try an Italian meringue frosting, as I've read it tends to be more stable than a Swiss meringue frosting.


And finally, a sneak peek into how I displayed these minis - on a beautiful three-tiered square pedestal cake stand!


Stay tuned for my summary post on the wedding dessert table!

champagne sherbet

To contact us Click HERE

Happy New Year!

On New Years Day we had half bottle of champagne left over from the night before, and of course I couldn't let it go to waste!  So the first thing that came to mind was to make champagne sorbet!


After a quick internet search for a recipe, I found this one at Simply Recipes, which looked and sounded delicious!  But halfway into making my sorbet, I realized that I didn't have any fresh grapefruit on hand.  So I did another search, and switched over to this recipe at Sugarlaws.  After cooking my sorbet mixture on the stove, I tasted it, and it tasted like a really bad cocktail!  So I decided to add some heavy cream to mellow it out.


After adding about a cup of heavy cream, I tasted it again, and it had magically transformed into a delicious creamy champagne concoction!  So I put it in the fridge to chill for the rest of the day, and later that evening I churned it in my ice cream maker for about 30 minutes.  I was a little concerned because even after 30 minutes of churning, it was still quite soft, but I figured that the amount of alcohol in it was the cause.  So after it was done churning, I poured the mixture into a freezer-proof container, and let it set in the freezer overnight.


The resulting sherbet (I call it sherbet since the addition of heavy cream no longer qualifies it as a sorbet!) was refreshing and full of champagne flavor.

Here's to a wonderful 2013!

2 Ocak 2013 Çarşamba

How To Back Up Your Entire Blog...2 Steps

To contact us Click HERE
Hi everyone! Just a few days ago I had an issue with my blog. I still don't know what happened, but pages weren't opening correctly and things were missing. It magically corrected itself, but made me realized...I need to back up my blog more.

I have made a plan to back up once a week, every Monday morning. I blog a lot during the week, so I need to back up more than I have in the past.

I blog with Blogger, so I will be showing you the "How Tos" with Blogger, but if you blog with Wordpress or Typepad, please research how to back up your blog!!! It's so important. You don't want to lose all your hard work.

There are 2 parts to backing up your blog.

  1. Backing up your template
  2. Backing up your posts and comments

How To Back Up Your Entire Blog...


Part 1. How To Back Up Your Template


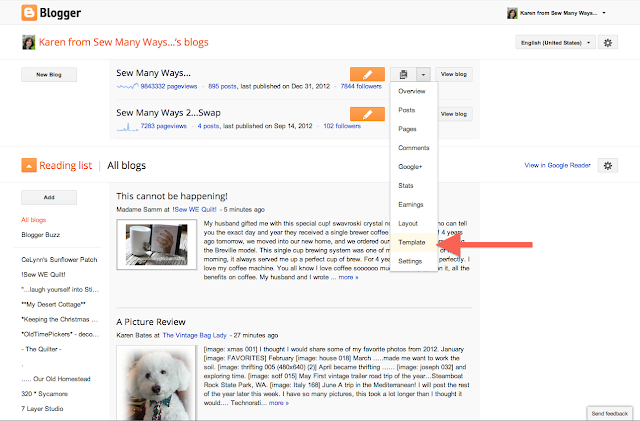
Go to your Dashboard and click the drop down box that I'm pointing to with the red arrow.


Select the TEMPLATE button...


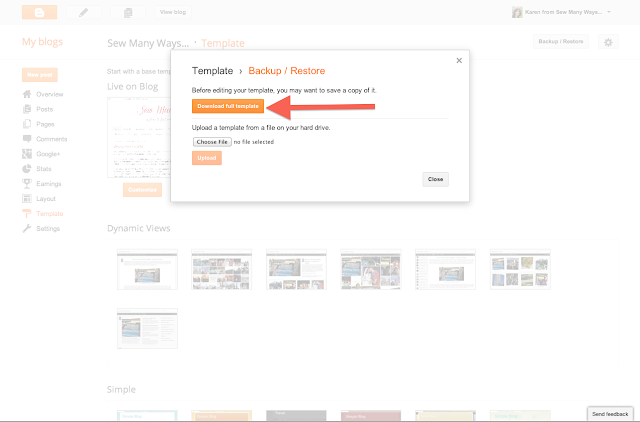
Go to the upper right corner where it says BACKUP/RESTORE...Click that


Then you will click "DOWNLOAD FULL TEMPLATE".

On my iMac, it went to my download section...your computer might be different.


Part 2. How To Back Up Posts and Comments...


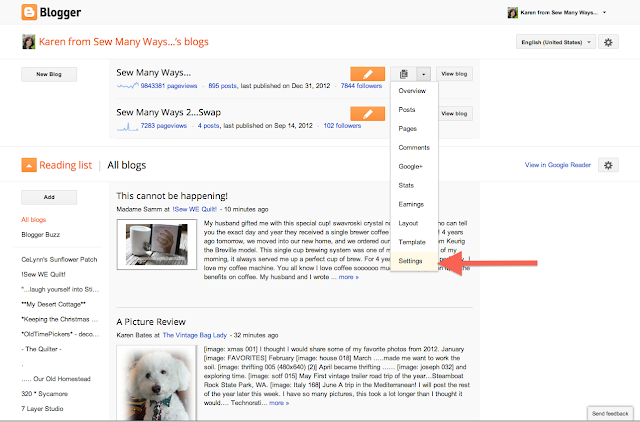
Go to Dashboard again and click drop down arrow to SETTINGS.

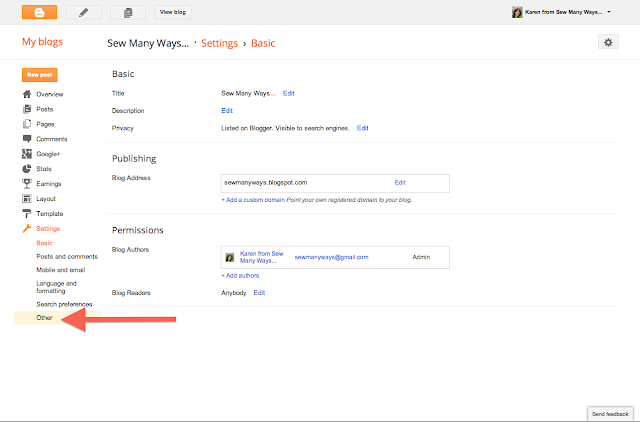
Then go to the bottom left and click "OTHER"


Then you will click EXPORT BLOG...


Then click DOWNLOAD BLOG...

There is a link to the help section if you want to read it first. Just click the "Learn More" when you are on that page.


That's it!! Two easy steps to back up your entire blog.

I think it's a good idea to get in the habit of backing your blog up on a regular basis...at least once a week if you blog often.

Happy Blogging,
~Karen~


Pin It

football cookies and tooth cookies

To contact us Click HERE

Along with the Hello Kitty macarons and potted plant chocolate puddings that I made for Cherish's wedding dessert table, I also made sugar cookies decorated with royal icing.  Since her groom loves football, she asked for football shaped cookies.  And she also asked for tooth shaped cookies, since she is a dental student!  She even sent football-shaped and tooth-shaped cookie cutters for me to use!  This bride thinks of everything!


For the cookie dough and royal icing recipes, I turned to my favorite sugar cookie recipe from Peggy Porshchen's book "Pretty Party Cakes".  Since I was making 75+ cookies total (I always make extra to allow for mess-ups!), I ended up making 3 batches of cookie dough, and 2 batches of royal icing.


After the cookies were baked and cooled, I started on the decorating.  For the football cookies, I first outlined my football by piping with brown stiff icing, and then filled it in with brown runny icing.  I let that dry for a few hours, and then used white royal icing to pipe the football laces on.


For the tooth cookies it was a similar process - I first piped an outline with white stiff icing, and then filled it in with white runny icing.


Once that was dry, I piped an additional white outline to finish it off.


And on the dessert table, I displayed the cookies on long white rectangular platters side by side.


Stay tuned for the next post on the last of the dessert table goodies!


mini s'mores cupcakes

To contact us Click HERE

This is last dessert in my series of posts on the goodies that I made for Cherish's wedding dessert table.  (In case you missed them, I also made Hello Kitty macarons, football and tooth cookies, and potted plant chocolate puddings).  Cherish had wanted some kind of cupcake on the dessert table, and since s'mores were one of the things in her "list of likes", we decided on mini s'mores cupcakes.


I ended up using an adaptation of a recipe that I had previously used from 6bittersweets, except I used my favorite Ina Garten chocolate cake recipe.  And since I was making mini cupcakes, I didn't think the graham cracker crust on the bottom would fit, so I just sprinkled crushed graham crackers on top of the batter before baking.

Once the mini cupcakes were baked and cooled, I made the marshmallow frosting (which is basically a Swiss meringue frosting), for which I followed the recipe exactly.  I used a large open star tip to pipe the frosting onto the cupcakes, and then used a creme brulee torch to lightly brown the frosting.

While I thought the cupcakes were was delicious and marshmallowy the night they made, by the next day (the day of the wedding) I bit into one and felt as if the frosting had become light as air.  That wasn't necessarily a bad thing, but I had wanted the frosting to retrain it's gooey marshmallow texture.  So next time I think I'll try an Italian meringue frosting, as I've read it tends to be more stable than a Swiss meringue frosting.


And finally, a sneak peek into how I displayed these minis - on a beautiful three-tiered square pedestal cake stand!


Stay tuned for my summary post on the wedding dessert table!

my first wedding dessert table!

To contact us Click HERE
I'm so excited to finally reveal (in full) the wedding dessert table that I worked so hard on a couple of months ago!  Cherish, the bride, was such a joy to work with, and is seriously one of the sweetest and thoughtful people I have ever met!  She had envisioned a classic rustic wedding, and handmade many of the wedding details, down to the paper doily flower chandelier that hung above the dessert table.  Her wedding color scheme was greens and blues, so when I arrived the dessert table was laid out with a bright blue tablecloth, ready for me to decorate with goodies!

First up were my Hello Kitty macarons.  I decided to display these in gallon-sized giant glass jars so that we could see all the cute Hello Kitty faces peeking out, and also so that they would also stay fresh in the contained jars.


Next up were the potted plant chocolate puddings.  I had decided to display them on either side of the dessert table - one one side of the table they would be stacked on a two-tiered ruffled cake stand, and on the other side of the table I used a single tier white milk glass cake stand.


Next came football-shaped and tooth-shaped cookies, which I displayed on four long white rectangular platters, side by side.


And finally the mini s'mores cupcakes, which I served on a white square three-tiered pedestal cake stand, right in the center of the table.


To sum it all up, here is my initial sketch of what the dessert table setup would look like:

And this is how the dessert table ended up!


This was seriously one of the funnest and coolest things that I have ever taken part in, and I'm so glad that Cherish asked me to do it!  Thank you, Cherish!

And now, a few images from Cherish's classic rustic dream wedding!


Congratulations, Cherish and Steven!