To contact us Click HERE
While we were on vacation in Hawaii last month, I found this awesome tool! And I had to buy it! It's meant for making pan sushi, which is basically made of ingredients that you would normally roll up in sushi, but spread out in layers inside a pan instead (and usually made with a layer of furikake instead of nori/seaweed paper), and then cut in squares to serve.
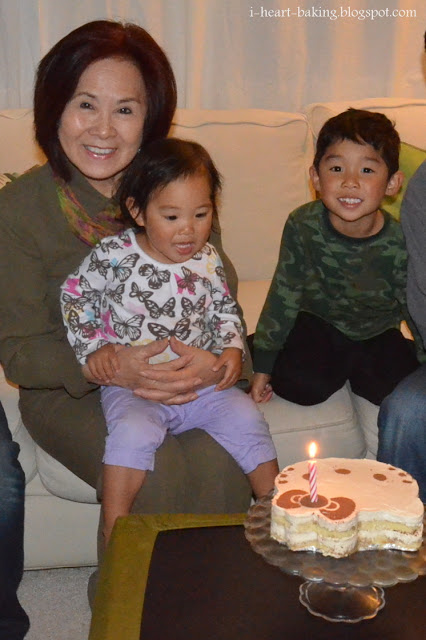
So what was the first thing I made with this tool? I made a Hello Kitty tiramisu cake! We were going to celebrate my mom's birthday a few weeks early since my brother was going to be in town, and since her favorite dessert is tiramisu I had been planning to make her tiramisu cake. And while I was unpacking all the goodies I had bought on vacation, I suddenly realized that I could use the pan sushi mold make the tiramisu instead!
So I found a tiramisu cake recipe in my copy of Dorie Greenspan's book "Baking: From My Home to Yours". The cake layer was a sponge cake, which I baked in two 9-inch pans. While the cakes were in the oven, I used the mold to trace and cut out Hello Kitty on a cake board, which I then covered in foil.
Then once the cakes were baked and cooled, I again used the mold to cut Hello Kitty out of the cake. I ended up using only one of the cakes, cut in half horizontally to make two layers, since both of the cakes together plus the filling would be taller than the mold itself.
Next, I prepared all the components I would need to assemble my tiramisu cake - I made espresso extract, espresso kahlua syrup (which uses the espresso extract), and freshly whipped cream to lighten a mascarpone filling (which also uses the espresso extract, as well as a bit of kahlua for extra flavor). Once all of the components were ready, I placed my prepared cake board inside the Hello Kitty mold, followed by the first layer of cake.
Next, I the brushed the cake with some of the espresso syrup.
Then came a layer of the mascarpone filling, and then a dusting of cocoa powder (or you can use chopped chocolate).
Next came the second layer of cake, brushed with more of the espresso syrup (on both sides). And then another layer of the mascarpone filling. This would be the top of the cake, so I made sure to smooth it out evenly with an offset spatula.
And then the final touch - one last dusting of cocoa powder, using a Hello Kitty stencil, in order to bring Hello Kitty to life!
The cake turned out light and moist, and full of tiramisu flavor.
I think the kids liked the cake even more than my mom! Happy birthday, Mom!
The cake was pretty simple to make, and we liked it so much that I made it again the following weekend for my friend Diana's belated birthday (since we were on vacation during her actual birthday!).
I hope she liked it as well! Happy birthday, Diana!
27 Haziran 2012 Çarşamba
golf ball cake - chocolate cake with cherries jubilee filling
To contact us Click HERE
My friend Bonnie recently asked me to make a cake for her husband's 40th birthday dinner, and I was excited because I hadn't seen her in years! Among the things that she mentioned about her husband included his love for golf, as well as cherries jubilee ice cream. So I decided to make a chocolate cake filled with cherries jubilee whipped cream filling.
As for the golf theme, I was a little undecided on what I wanted to do with this. Initially we thought that I could pipe the Pebble Beach logo on top of the cake. Or, I could decorate it with white chocolate golf balls, which would look similar to the golf ball cake pops that I had made a while back. And then, I stumbled accross this cake at love & olive oil via foodgawker - it was such a cute and clean design (and not overly cheesy considering it was a golf ball cake)! I immediately wanted to make it!
Bonnie only needed enough cake for 10 adults, so I made it a 6-inch cake. For the chocolate cake layer, I used my favorite Ina Garten chocolate cake recipe. While that was baking, I started on my filling. I found this recipe at Epicurious for cherries jubilee, and proceeded the make the cherry sauce. (The only thing that I changed was to add a little bit of corn starch slurry at the end to thicken the sauce.)
I had never had cherries jubilee before so I had no idea what it was supposed to taste like; it ended up tasting like caramelized cherries, but not with an overwhelming cherry taste. So I pureed the sauce, and then mixed a portion of it with cream cheese, to give the filling a bit more tartness. Then I made a batch of whipped cream, which I then folded into the cherry cream cheese mixture.
Once the cake was cooled, I put the first cake layer on an 8-inch cake round, and then piped on a layer of the filling. Then, to add extra cherries jubilee flavor, I brushed on some of the sauce onto the top of the second cake layer, which I then inverted onto the filling layer.
For the frosting, I made a batch of buttercream, and then added a stick of cream cheese to it at the end (as I find regular buttercream too sweet, and I love the tang of cream cheese in a frosting). I added just enough green coloring to suggest the color of grass, and then use an offset spatula to apply the first "crumb coat" layer of frosting.
After letting that set in the fridge for a half hour or so, I applied the final "smooth" layer of frosting. I didn't worry too much about making the top super smooth, as that would end up covered with piped grass.
Then came the fun part. Using a special tip that has multiple holes, I covered the top of the cake by piping on "grass". And then I piped on a "grass" border on the bottom of the cake as well.
For the golf ball decoration I used white chocolate and this golf ball candy mold, and I made a few just in case there was any breakage. The first step was to cover the insides of a few of the golf balls of the mold with melted white chocolate, and then placed it in the fridge for them to harden. This would be one half of each golf ball. Once they were set, I popped them out of the mold, and then repeated the step to cover mold in chocolate.
Then, before the chocolate hardened, I topped each one with the other half of the golf ball from step one. This way, the new chocolate would harden with the other half attached to it, to form a complete golf ball. I chose the best looking golf ball out of the ones I had made, and placed it on top of the cake.
The final touch was a little birthday banner that I made out of craft paper, thread, and bamboo skewers - similar to the ones I had made for the Superman cake and the Thanksgiving birthday cake. I tried to stick with "manly golf colors" that would go with the color of the cake, but I guess you can only get so manly when it comes to a festive birthday banner!
It was so great to see Bonnie again after so many years, even if it was only for a few minutes when I went to drop off the cake. Happy Birthday to her hubby Dave! Hope everyone enjoyed the cake!
*** Update: Made a second golf ball cake here! Except this time it was an 8-inch cake and filled with chocolate mousse!
lime green layer jello for st. patrick's day
To contact us Click HERE
There weren't very many things to sign up for on the sheet for the St. Patrick's Day party at Matthew's preschool this year. A few slots for napkins or plates were still open, but I had been wanting to make cookies this year, and that section was already full! In fact, only one food item was left ... lime jello. So that's what I signed up for.
Last year the same thing happened with the Valentine's Day party, and I ended up making seven-layer rainbow jello. I thought I could do the same thing again, except this time I would only have green and white layers. So I used the same recipe as last time, from foodlibrarian, except instead of four different flavors jello, I only used lime jello.
For the white layers, I didn't have any sweetened condensed milk on hand, so I ended up using a 12 oz. can of evaporated milk with 2/3 cup sugar whisked in. I think it ended up tasting the same, however after the gelatin hardened the consistency wasn't as firm as it should have been, which didn't surprise me since evaporated milk is much more watery than sweetened condensed milk.
In the end, Matthew missed out on the party completely - he had a fever that morning, so he had to stay home from school that day. Poor kid, he was so upset! He kept saying, "But they're going to have a pinata!". So I saved some jello just for him, and then I brought the rest to school. Hope everyone at the party enjoyed it!
purple ombre petal cake with chocolate butterflies for mother's day
To contact us Click HERE
My mom likes desserts that are not too sweet. And, she loves lemon. So for Mother's Day I decided to make her a lemon blueberry cake, with purple ombre petal frosting for a girly feminine touch.
Initially I was going to make a lemon cake with blueberries in the batter itself, but last minute I decided to just make it a lemon cake, filled with blueberry whipped cream. I had been eyeing a recipe for "hot milk cake" in my copy of "Miette" by Meg Ray; it sounded interesting because it was the total opposite of any other cake recipes I had tried. While usually I would combine the fat with the sugar and then add eggs, and then alternate a flour mixture with milk, this recipe called for beating eggs with sugar, then adding the flour, then melting butter with hot milk, which is then poured into the cake batter at the end. Interesting! I wanted to try it. The only thing I changed was adding lemon zest to the batter, to give a nice lemony flavor to the cake.
The blueberry filling was fairly simple - I whipped heavy cream with a bit of confectioner's sugar and vanilla, and when it started forming stiff peaks I added a few tablespoons of pureed blueberries (blueberries that I had pulsed in the food processor), and then whipped it a bit more to incorporate.
For the frosting, I wanted a light frosting that wasn't too sweet, so I chose this swiss meringue cream cheese frosting at 6 Bittersweets - I've been wanting to try her recipe, and it sounded perfect with the lemon and blueberry combination. But I must have done something wrong, because my frosting came out very loose. I tried refrigerating it for a while and then rebeating, but this only lead to clumpy not-smooth frosting. But I was running out of time, and besides it still tasted great, so I used it anyway.
I piped a border of frosting on the perimeter of my first layer of cake, so that the soft filling would not leak out. Then I filled it with the blueberry whipped cream, and then topped it with my second layer of cake. After a quick crumb coat of frosting, I began the fun part of creating the petal look of the frosting. I found this great tutorial at Hungry Housewife, which shows you step by step how to create the petals.
I also made chocolate butterflies for the finishing touch! I found a great tutorial here. Initially I was going to make the butterflies purple, but since the top of my ombre cake was purple in the middle, I decided to just make them chocolate so that they would stand out.
When we cut into the cake, the inside looked so pretty with the purple and lemon yellow constrasting colors! The cake was nice and lemony, but very very dense, and tasted almost like a lemon pound cake. But the overall combination of lemon and blueberry flavors was nice.
Happy Mother's Day, Mommy!
rhubarb and honey tart
To contact us Click HERE
Last month, I went to the dentist three times. There was a checkup visit, a second visit to replace two cracked fillings (during which I endured 3 painful shots to numb me which did not work), which led to a third visit to actually replace the fillings (this time I got numb after 4 painful shots, yay!). As you can see from my Instagram picture, I wore my favorite Hello Kitty shoes to cheer myself up ... I was really nervous!
The day after my fillings were finally replaced, I announced out loud that I was going to make a rhubarb tart, to which my husband promptly reminded me, "Think of all the trips to the dentist you just had!" But, fueled by my recent revisit to baking with rhubarb, I insisted that I must do it while rhubarb was still in season! Although, I compromised with him - based on my husband's theory that honey doesn't give you cavities (question for you dentists out there - is this true?), I decided to try making this rhubarb tart with honey instead of sugar.
Usually I make my rhubarb tarts in this round tart pan with removeable bottom, but this time I chose to use my new rectangular tart pan (similar to this one). So I made my favorite Martha all-butter pie crust (2 1/2 cups flour, 1 tsp salt, 1 tsp sugar, 2 sticks butter, and ice water to bring it together), and carefully rolled and lined my tart pan with the dough.
Then I sliced my rhubarb and mixed it with honey (about a half cup), a pinch of salt, and a couple of tablespoons of flour.
Then came the fun part - arranging it in the tart pan! I've tried arranging it in a vertical pattern as seen here, as well as a horizontal pattern as seen here, but this time since I was using a rectangular tart pan I decided to make two long rows of rhubarb.
Then I brushed the exposed pie crust with egg wash, and sprinkled on a bit of sanding sugar before popping it in the oven.
After about 50 minutes in the oven, it was done! By this time the whole house smelled delicious.
When I first sliced it, I didn't love the way the rectangular piece looked. I was starting to think I should have made it in the round tart pan after all.
But then I realized that I could still slice it into triangular pieces. In love with rectangular tart pan once more.
It's even better with a scoop of ice cream. For breakfast.
With a cup of coffee to top it all off. The end.
Kaydol:
Kayıtlar (Atom)