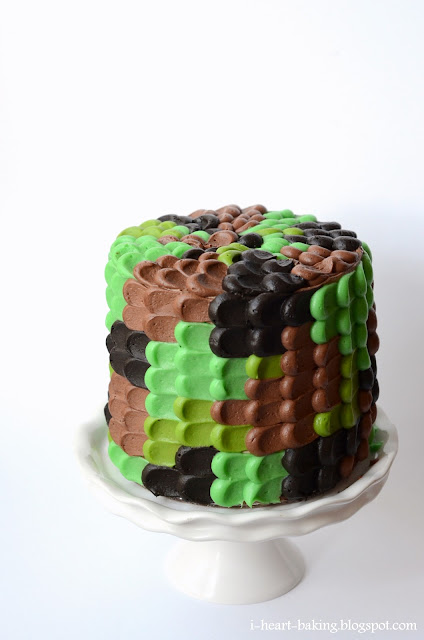
For my husband Grant's birthday last year, I made him this cake covered with rainbow sprinkles, with a hidden chocolate mousse heart inside. I had wanted it to be happy and rainbow-themed, but I guess it turned out kind of ... girly? So this year, I wanted to make him a manly cake. So I made him a camoflauge cake!

For the frosting, I had brainstormed and sketched a few ideas on how I would execute the camoflauge design. One idea would just be a simple piping of swirls of camoflauge in two shades of green, brown, and black. The other idea was to use those same colors, but pipe them in sort of a petal effect, similar to the purple ombre petal cake that I made for Mother's Day. After sketching it out, I thought the petal effect would be super cool! So I decided to try it.

Grant's favorite ice cream flavor of all time is cookies and cream. So I decided on a three-layer chocolate and vanilla cake, filled with cookies and cream whipped cream! I baked two 6-inch layers of chocolate cake using my favorite chocolate cake recipe from Ina Garten (I actually baked three and put one in the freezer, tightly wrapped of course), and one 6-inch layer of vanilla cake using the "hot milk cake" recipe from the book "Miette: Recipes from San Francisco's Most Charming Pastry Shop".

For the whipped cream filling, I chopped up some oreo cookies (actually, I used "Joe's Os" cookies from Trader Joe's), and mixed it into freshly whipped cream, flavored with a hint of vanilla. I wanted a thick layer of the cookies-n-cream filling, so at this point I also made a cream cheese buttercream frosting so that I could pipe a border of it on each cake layer, to keep the filling from squishing out from the weight of the cakes above it.

I wanted the inside of the cake to look like an oreo cookie itself, so the bottom layer was chocolate cake, followed by a layer of vanilla cake, and then a final layer of chocolate cake, all separated by the cookies-n-cream whipped cream filling. This created quite a tall cake!

With the remainder of the cream cheese buttercream, I divided them into four portions, the amount varying by how much of each color I would be needing: brown, black, green, and light green. For the black icing, I added dark chocolate cocoa powder, as I try to avoid coloring as much as possible, so I only had to add a tiny bit of black coloring. For the brown icing I simply added cocoa powder, but for the greens I had to use coloring (although for the light green, I added a bit of cocoa powder to give it more a "dirty" light green effect).
First I did a quick crumb coat with the chocolate frosting, and after letting that set in the fridge for a bit I was ready to start camoflauging!


Using the method described in this tutorial from The Hungry Housewife, I piped my petals one vertical row at a time, creating patches of different colors to create the camoflauge effect.

Then I piped the top of the cake using the same technique (although in my opinion, it came out kind of squished, and resembled M&Ms on the top of the cake).

And then I was done! One very tall camoflauge cake. (I won't call it a "petal cake", to keep with the "manly" theme of the cake!)

I hope you enjoyed your cake, my love! Happy Birthday!


Hiç yorum yok:
Yorum Gönder