Decorating for Christmas is like a hobby for me. I start thinking about next year's Christmas on december 26th. Where do I start?...the after Christmas sales this year. I always buy things on clearance...never full price. I bring the decorations home, organize them and find a place for them, so I know where they are next year. I change things up, move things to different rooms, so it feels like I have new things each year.
Let's start this year's tour from the front door and end at the back door...
Last year I had the Snowman wreath on the front door, but this year I just have a wreath and some decorations off to the side.

My childhood sled and skates with some greenery.

Bucket of snowballs too...styrofoam balls covered in scrap quilt batting.

Our new family room tree...
The old one, which is in our master bedroom, was a narrow slim line. This one is from Walmart and has a much wider shape for the room.

This tree is our family tree...ornaments from friends, family and the girls get a new one each year.

The girls get a new ornament each year that means something special for that year. Courtney's ornament is a suitcase for her trip to Japan in January.

The metal ornament is for my husband's hike up Mount Washington this summer.

The tree is so wide, I used a new painters drop cloth for a tree skirt.

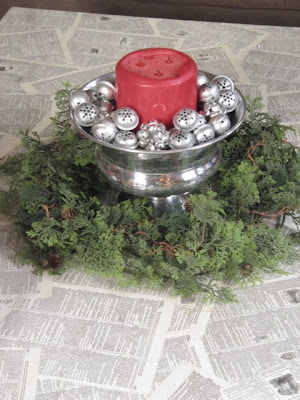
Decorations can be something as simple as a bowl of jingle bells and a candle. Click here for that post.
Large walls are a challenge for me even with everyday decorating. This "JOY" wall decoration really fills in the space.

Just take heavy duty wire and bend it in the shape of the letter you want, then cover it with evergreen garland.

I wrap garland around the railings going upstairs. I use zip ties to attach the evergreen to the wood railings.

I use the same garland over and over each year. I purchased the sugar fruit years ago. I try to add a little bit each year.

I found a small box of sugared strawberries in a thrift store this summer.

I attached the fruit to the evergreen with ornament hangers or I use floral wire.
I made the bows, but neatly pack them away and just poof it up each year.

The coffee bar gets a little greenery too.

Pre-lit tree little tree was only $5.00 after Christmas last year. Just pop it in a old plastic urn I painted black for the front porch.

For parties, I serve coffee in the big coffee urns here.

Santa tree...lots of tutorials for this.

Santa ornament click HERE.
Peppermint garland click HERE.

Santa Tree click HERE
How to decorate a tree click HERE.

Vintage tricycle and wagon I bought at Goodwill under the tree holds presents and a teddy bear. Reminds me when our daughters were little.

Tree in the den...

Kind of Dr Seuss...

Pom pom flowers from the floral department for the top of the tree.

Mix textures, colors and shapes and fill in all the blanks.

Dollar tree ornaments look great mixed in with other glitter ornaments.

The packages of word ornaments work great too.


The tree skirt is a $5.00 red fleece blanket from Walmart.

I had extra green ornaments, so I made a wreath for the table.
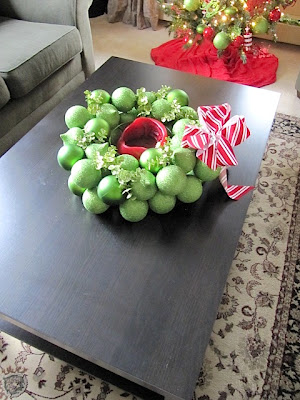
In the middle of the wreath, I placed a glass bowl and filled with a candle.

For a wreath, use different types and shapes of ornaments.

Just thread ornaments on a sturdy wire and keep adding until it's all filled in.
Here's a picture of the wire.

The spots where the wire showed, I added little sprigs of glitter greenery I had from an old arrangement.
Seriously...I save everything!!

Just add a bow.
You could easily do this with one of those large packages of ornaments you might purchase at the after Christmas sales.

When I have our Christmas parties, our dining room table becomes a buffet table. I pull all the chairs away and use them throughout the house.
With all the chairs missing, the table looks blank underneath. I went in the garage and found my old wooden toboggan.

Added some wrapped packages and gift bags and a little tree.
Definitely fills in the space under there for no money at all.

Fireplace was simple too...wreath and basket of wood.

Add real greenery to basket of wood for the fresh scent of Christmas!!

Small set of battery powered lights too. Hallie seems to like the real scent of evergreen.

Up stairs we go...
Master Bedroom first.
Our old 12 foot family room tree is now our 9 foot bedroom tree...just took off the first bottom layer.

A piece of burlap for tree skirt and Dickens Village around the base.

This tree is in honor of my mom. She collected these Steinbach ornaments forever.

Wrapped packages on the ottoman and an old quilt for a little Christmas vignette.

Wreath and trees for simple look around the bed.

Click HERE for coffee filter wreath tutorial.

Simple trees next to the bed with a few clearance items for sparkle. The mercury glass jar was from TJ Maxx. Lamps were my mom's from the 1960's with new $15.00 shades from Walmart.

Dickens Village on top of the armoire.
The burlap bag on the knob was saved from a coffee and tea gift set. Just filled with evergreen.


Even the bathroom gets a little green swag on the mirror and a wreath on the wall.

and a tree on the cabinet.

My husband's office gets a tree like the one from his childhood.

Colored glass balls, tinsel, popcorn garland and big colored lights.

You know those big colored lights that used to get so hot!! This is his favorite tree!!

At the top of the stairs is the candy tree. This is the first year for this tree. The pre-lit white tree was $5.00 in the 90% off section.

Bought the wirery candy decorations after Christmas last year for 25 cents per sprig.

Used a combination of pastel colored balls I already had.

Pack it in there for a full look.


Fake candy gumdrop garland I found at Hobby Lobby.

Quilt batting under the tree for the tree skirt to make it look like Cotton Candy.

Wrapped packages to hide the electrical wire...plug was around the corner.

Courtney's tree is all silver...

Again...use different shapes and textures of silver. Glitter, shiny, matte finish and quilted.


Kelsie's room is silver and gold...the tree is in a big galvanized bucket from Home Depot $13.00. I usually use those buckets for chilling drinks for parties.


Shadow boxes in Kelsie's room have simple flat ornaments hanging from the nail.

Now the back door...
My mom always had a sign hanging on her back door...
"Back door guests are always welcomed best"

Click HERE for the Snowman Wreath tutorial.

I used big plastic candy canes for the arms instead of branches like I used last year.

I have one suggestion...be careful where you hang Mister Snowman
Last year I put the Snowman Wreath on my front door which is solid with no window.
This year it's on my back door that has a window. This is what I see each I come around the corner in the back hallway.
It literally scares the bajeebers out of me every time...looks like a person at the door. LOL
Sorry Mister Snowman...no more back door for you!!

I hope you enjoyed the tour for this year. Sharing these pictures here also helps me remember how I decorated each year.
If you want to see where I store and organize all this "stuff"...click HERE for that post!!
Remember...
- shop after Christmas sales
- think of a theme and shop for that over a period of time. You may not get it all at once.
- store them away, so you know where they are next year
- think outside the box while decorating. You probably have all the things to make something new and different each year.

Hiç yorum yok:
Yorum Gönder