This post is picture HEAVY to make it easier for you to see the step by step instructions. I always thinks it's much better to "see" the directions than "read" them. There are also little tips and tricks along the way.
Measuring...
To start, we all have different window widths and lengths, so adjust for your own drapes. The drapes for my project were just for "looks"on the sides of the windows, not function. The drapes will never be closed in the office waiting room, so I only needed the 54 inch width of the home decor fabric. (54 inches is the standard width for decorator fabric on the large bolts at the fabric store.) If your windows are wider, you will need to sew panels together to get the width you need.
For the height or length of the drapes, measure the length from the rod (if using a pocket) or from the bottom of the clip ring (whatever system you are using). Take that measurement and add 12 inches.
For example, my windows finished at 90 inches...so 90" plus 12" is 102".
3 yards of fabric is 108 inches, so I purchased 3 yards for each side panel...always leave room for mistakes or mis-measures.


Tools Needed...
They are not necessary, but some items will make the job a little easier.
- lots of floor space!
- ruler
- tape measure
- pins
- scissors
- portable ironing mat and iron
- if you have them...rotary cutter and cutting mat
- quilt rulers if you have them...yard stick if you don't

Here's the fabric I used in case anyone wanted to know the name. I bought it at Joann's...here's the link

Drape Tutorial...
Just to worn you, you will be on the floor and on your knees a lot!! Lol.
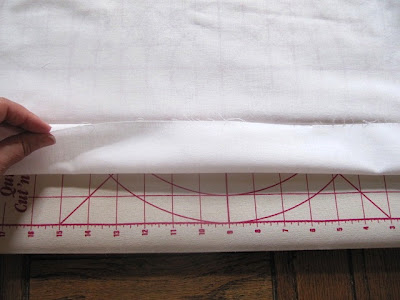
To cut each panel or to straighten the edge, fold fabric in half lengthwise.

Line the sides and the part you are cutting with lines on the cutting mat and then trim with ruler and rotary cutter.
TIP...if you have tile floors, use the lines in the floor as a cutting guide.
If you have quilt rulers, you know they are only 24 inches long. In the picture below, I used 2 rulers to cut the longer length I needed. See the yellow one on the bottom and the red one towards the top?

Find the line on the bottom of cutting mat...

Add the second ruler to the top to extend the first ruler...

then line up the second ruler with the same number at the top of the mat.

Trim with rotary cutter all the way up, holding the second ruler when needed.

I also trimmed the selvage edge on both sides of the fabric. Selvage edges are very tightly woven and it pulls the fabric when sewn...making it pucker.

TIP...did you know all those dots on the selvage edge are all the colors used in fabric. This is great to take with you when picking other matching fabrics or paint colors for the room.

Once everything is cut, lay fabric on the floor and fold up the bottom 8 inches.
WATCH FOR DIRECTIONAL FABRICS WHEN DETERMINING THE BOTTOM AND TOP

8 inches

I placed the portable ironing mat under the hem and ironed flat.
So much easier to keep every thing on the floor when working, rather than moving all that fabric to the stand up ironing board every time.


Now unfold the 8 inch hem.

and fold up the raw cut edge to the ironed line.

You will have a 4 inch fold.
 Iron that flat.
Ironed all the way across.

Now take that 4 inch fold and fold over again.

Iron flat again. You now have a 4 inch, double fold hem. Great weight for the drape to hang.

Pin all the way across

Use matching thread.

Sew close to edge. I use the inside edge of the foot as a guide.

TIP...pin the hem with the point of the pin towards the edge you are sewing, but not quite in the lane of the stitch.

That way you can sew away and not have to stop to remove pins or run them over and break a needle.

Hem is finished!

Lining Tutorial...
Pretty much the same for drapes, but the WIDTH of lining is 4 inches SMALLER than drape fabric, So for example, my drapery fabric is 54 inches wide...I cut the lining 50 inches wide.
Same way to trim or cut to length as drapes.

Lay flat on floor.

The DIFFERENCE in hem is...you will fold up 4 inches first.

Iron flat.

Open up hem...

and take raw edge and fold up to ironed line...2 inches
Iron flat.

Then take that 2 inch fold and fold up again.

You now have a 2 inch wide, double fold hem.

Match thread to lining too, for a professional look.

Sew close to edge with same pin technique.

Done!

Drape Assembly...
Lay hemmed drape on the floor, right side up.

Now place your hemmed lining on the drape, RIGHT SIDES TOGETHER.
BUT only align one side of the edge.
I aligned the right side in this picture.
You will also leave 1-2 inches of drape fabric showing at the bottom.

Here is the close up of the hems. I measured 1 1/2 inches of drapery fabric showing.

Pin temporarily on the bottom until all measurements and smoothing are done.

Right side pinned, and bottom measured at 1 1/2 inches.

Now sew the RIGHT side only...the length of the drape with a 1/2 inch seam allowance.

Now the skootching part...
Unpin the temporary bottom pins.
Now drag over the lining fabric to the left side. (this is where the 4 inch difference comes in for the widths)

Line up the left side the length of the fabric.

Make sure you remeasure the bottom hems at 1 1/2 inches again.

Pin the length of the left side and sew with a 1/2 inch seam allowance, just like the right side.

Now you have a tube (open on the bottom and the top). Turn right side out.

This is the only time I took it to the ironing board. I pressed the seams with drape fabric on one side and the lining on the other. This cleans up the seams.

Back to the floor...
Smooth out the fabric so the the drapery fabric is showing...even widths on each side.

Close up.

Stay on the floor and iron both sides.


Finishing the corner points...
See that raw edge of the drapery fabric?

Fold it under diagonally.

Iron flat.

Sew with a hidden stitch. Start at the top...

Pick up a little of the bottom fabric and come up with a little of the top fabric.


See the little vertical stitches before you pull it tight?

Pull and they're gone.

Done nice and neat!

Top of Drapes...
This part is up to you...you may be using a rod pocket or clips or tabs.
To finish, just trim away so both fabrics are even.

Good gravy that's not very straight, Lol. I think this was my fourth panel and I was dizzy!!

Fold over once...

and then again. I did a 4 inch hem folded over twice to finish at 2 inches wide. This 4 inches and the 8 inch main hem gave me the extra 12 inches that I mentioned earlier.
Measure according to your needs.
Sew close to edge.

I used rings with the clips.

Lined drapes hang nicely from the weight and the lining protects the fabric from the sun.

I really hope you enjoyed this picture tutorial for lined drapes. I know there must be other ways to make these, but this worked great for me.
Good luck with yours.
Happy Sewing,
~Karen~

Hiç yorum yok:
Yorum Gönder