Hi everyone! Here is the first quilt block in the "Block of the Month Club"...The Bow Tie Block.

I would LOVE it if you joined the Block of the Month Club, but there's one thing you have to do. DON'T STRESS.
There is no pressure in this Block of the Month Club. If you make the April block in May, the block police will not be handing out citations. LOL !!
Here are my thoughts on this...
- I will share a tutorial for a different quilt block each month...12.5 inches (unfinished size=the size of a single block before you sew it to the other blocks)
- this won't be a 12 month plan...I'll just keep sharing a block every month for as long as I can. I am bound by the non-copyrighted blocks.
- you can take one block pattern and make a whole quilt out of that one pattern (making one block a month or several all at one) or...
- you can wait for each month and make different blocks, then construct the whole quilt out of your blocks...stopping with size YOU want. Lap, throw, twin, queen, king etc.
- use your favorite style of fabric...modern, traditional, 1930's, baby, brights, civil war etc
- my examples will be scrappy, but you can use all the same fabric for all the blocks if you'd like
- I will try to make each tutorial picture heavy and explain in detail for the NEW quilter. If you're experienced, you may only need the pictures for inspiration.
Bow Tie Quilt Block
This block is made up of 4 bow ties...in a circle shape.

Here is what you need...
8 dark colored squares cut at 3.5 inches
8 light colored squares cut at 3.5 inches
8 dark colored squares cut at 1.5 inches

I keep the squares on an a cotton air conditioning filter to keep me organized and it's easy to carry from the cutting table to my machine.
Click HERE if you are interested in reading about it...it will explain the need to buy a cotton air filter not a fiberglass air filter.

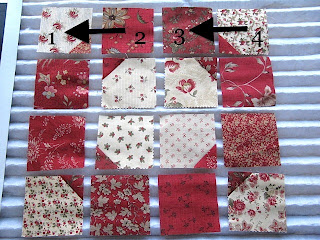
Here is the arrangement of the 1.5 inch dark squares on the corners of the 8 light squares.

Close up...

This is how they will all look.

Pin if you want to be safe.

We will be sewing on the diagonal from upper left to lower right.

There are several methods for this...here's one.
Draw a diagonal pencil line with a ruler.


Or you can use the markings on your machine.

The point of the block will be on the zero...see where I'm pointing?

SEWING TIP...
- sew with a SCANT seam
Definition of SCANT seam- sewing a seam that is a slight bit "SMALLER" than the desired seam width. One thread smaller.
When I sew corner triangles on squares, I use my regular sewing foot. There is more coverage of the foot on the fabric for better control of fabric.
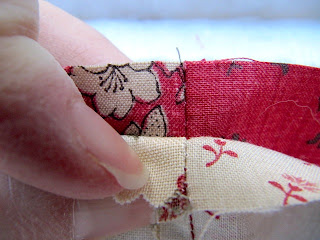
Here is a scant seam...

See how the center mark of the presser foot is just a slight bit over to the right?

See my stitching just to the right of the pencil line?
Why do this??? The thickness of your sewing thread and the folding over of the fabric takes up the smallest of space, but it's does take up some.
This is true when sewing rows together too. When you're sewing block after block together, those "little" measurements add up...making for a smaller row of blocks than desired.
This will prevent your blocks from becoming too small and not the true desired size. Even if the block is a little bigger, you can always trim away, but you can't add with out taking out the seam.

Press sewn seam first. Then open, fold back and press again.

Done...

Now for the universal trimming debate.
"To trim or not to trim"...that is the question.
Some leave the full square to keep the true measurement of the square.

or trim to reduce the bulk. I always trim.
You can just eyeball it at 1/4 inch, because the size of the trimmed seam isn't crucial.

or be accurate and use your quilt ruler and rotary cutter and trim a true 1/4 inch.


If you want to be "really" accurate with the finished size of your square, you can use a square ruler and trim away any little bit of fabric that overhangs on the corner.
Place the ruler on the square and make sure the left edge is on the correct size of the square...in this case 3 1/2 inches.

and the bottom edge as well.

Now look to the top right corner and any excess fabric will be beyond the ruler.

Use rotary cutter to trim away the excess fabric.

Here is the back of a trimmed block.

Now take your stack to the machine and sew the rest of the corner squares to the larger squares.

To save time, you can chain piece, which is sewing block after block without stopping and cutting the thread.

Just keep sewing and adding a new square to the chain of thread.

All of the squares chain pieced.

Cut them apart and then trim the extra fabric if desired.

All 8 need to be iron like the bottom right square.

Here is the placement of the squares

You can sew the blocks together any way you like, but here's how I do it.
First Row...with right sides together, fold over square #2 onto #1 and sew with a SCANT 1/4 inch seam.
Then sew #3 onto #4 in the same manner...
Here's where I use my 1/4 inch presser foot.

Now take the 2 sections you just sewed and place them right sides together. Make sure you keep them in the correct position though.

Right sides together.

Sew with SCANT 1/4 inch seam.
See the 1/4 marking on my machine? I'm just shy of that.

Now press all seams to one side.

Mine are all to the right on the back side.

Row one complete.

Do the same for all the other rows.

All squares sewn into 4 rows.

All seams ironed in the opposite direction

Now, with right sides together, sew row #1 to row #2 with SCANT 1/4 inch seam.
Then sew row #3 to row #4.

Match seams.
Pin to secure when sewing to keep seams accurate. Like that crooked pin? Don't run over your pins..LOL

Sew pinned rows right sides together.

Press sewn seams, then iron seams opened.

If you pin, the seam intersections should look like this.

Now sew the 2 sections, right sides together.


Press, then iron seam open.


This is one tradition Bow Tie Block in the black outline, but sewn into this configuration of 4 in a circle is really cute in a whole quilt or perfect for a Sampler Block of the Month quilt


Size is 12 1/2 inches...unfinished.
Unfinished size means the size of the block before you sew it to the other blocks in a quilt top.

Happy Quilting!!
~Karen~

Hiç yorum yok:
Yorum Gönder